At Extrusion & Axis, purchases made through some links may earn us an affiliate commission at no extra cost to you. How Extrusion & Axis affiliate funding works
For stage rally and drift disciplines, an analog handbrake is not an aesthetic accessory—it is an essential vehicle dynamics control. Locking the rear axle on demand initiates rotation into tight hairpins and maintains drift angle by breaking rear traction without upsetting front-end steering geometry. While premium sim racing ecosystems offer proprietary hydraulic or load-cell levers running hundreds of dollars, standalone USB Hall-effect handbrakes have become the standard entry-to-midrange solution on PC.
Understanding how these independent USB peripherals interface with your simulator, what internal sensing mechanisms they utilize, and how mechanical mounting stiffness impacts input consistency is critical before adding one to your cockpit.
Standalone USB handbrakes are recognized natively by Windows as standard Human Interface Devices (HID DirectInput game controllers). When marketplace titles cite compatibility with "Logitech G29, Thrustmaster T300, or Fanatec," this means the handbrake operates in parallel with those wheels over an independent PC USB port. These devices do not plug into wheelbases and are not compatible with PlayStation or Xbox consoles, which require proprietary controller authentication chips.
Sensing Technology: Why Hall Sensors Dominate the Budget Segment
Sim handbrakes rely on one of three sensing methods: digital on/off switches, potentiometers, or contactless Hall-effect sensors (with load cells and hydraulic pressure transducers occupying the ultra-high tier).
- Digital Microswitches: Common on ultra-budget levers or re-purposed flight stick throttles. They provide 0% or 100% actuation with no modulation, causing harsh, unprogressive lockups that snap rear weight transfer violently.
- Rotary Potentiometers: Offer analog travel, but rely on physical wiper contacts sliding over a resistive carbon track. Over repeated aggressive pulls, mechanical wear and fine metal dust degrade the contact surface, introducing axis jitter and dead spots.
- Non-Contact Hall-Effect Sensors: These devices measure displacement through magnetic field strength variation as an integrated neodymium magnet sweeps past an internal IC. Because there is zero physical friction between the sensor and moving target, the electronics do not degrade over thousands of actuation cycles, offering high consistency at low manufacturing costs.
Most generic standalone USB handbrakes run on an internal microcontroller board (commonly based on an ATmega32U4 architecture) sending a linear 14-bit or 16-bit analog axis over USB. This provides smooth progressive output as the lever compresses its return spring.
Evaluating Lever Chassis and Desk Mount Options
The principal failure mode of sub-$100 handbrakes is not electronic—it is mechanical flex. Pulling a 300 mm to 400 mm lever exerts significant rotational torque on the baseplate. Inadequate sheet steel thickness, unbushed pivot bolts, or flimsy clamping brackets absorb energy that should be transferring into spring compression, creating mushy lever feel and erratic threshold release.
1. Modular Vertical-Spindle Architecture
If you mount directly to an aluminum profile rig (4040, 4080, or 40120 extrusion), look for a baseplate with slotted mounting channels and an exposed rear compression spring.

This design uses a CNC-machined aluminum upright lever connected to a horizontal guide rod that compresses a high-rate coil spring against an adjustable stop nut. The primary mechanical advantage of this format is vertical height adjustability along the handle stem, as well as easy access to the spring stack. You can readily swap the stock spring or add a polyurethane skateboard bushing to tune mechanical travel distance and preload firmness.
2. Dual-Plate Pivoting Rally Lever
The traditional drift/rally chassis uses twin side plates sandwiching the main pivot bolt, with the electronics housed inside a protective top enclosure.

This format typically features an integrated mechanical latch hook (reminiscent of hydraulic rally staging levers) and a padded foam grip handle. The curved forward lever arm brings the handle closer to the steering wheel rim when mounted beside a sequential shifter. However, because the base relies on vertical mounting holes drilled directly into the perimeter flanges, mounting it to an extruded cockpit often requires an adapter plate or specialized corner brackets to prevent lateral twist under hard side pulls.
3. Integrated Desk-Clamp Bundles
For desk-bound sim racers who lack a dedicated cockpit, purchasing the handbrake paired with a factory-matched C-clamp prevents fitment headaches.
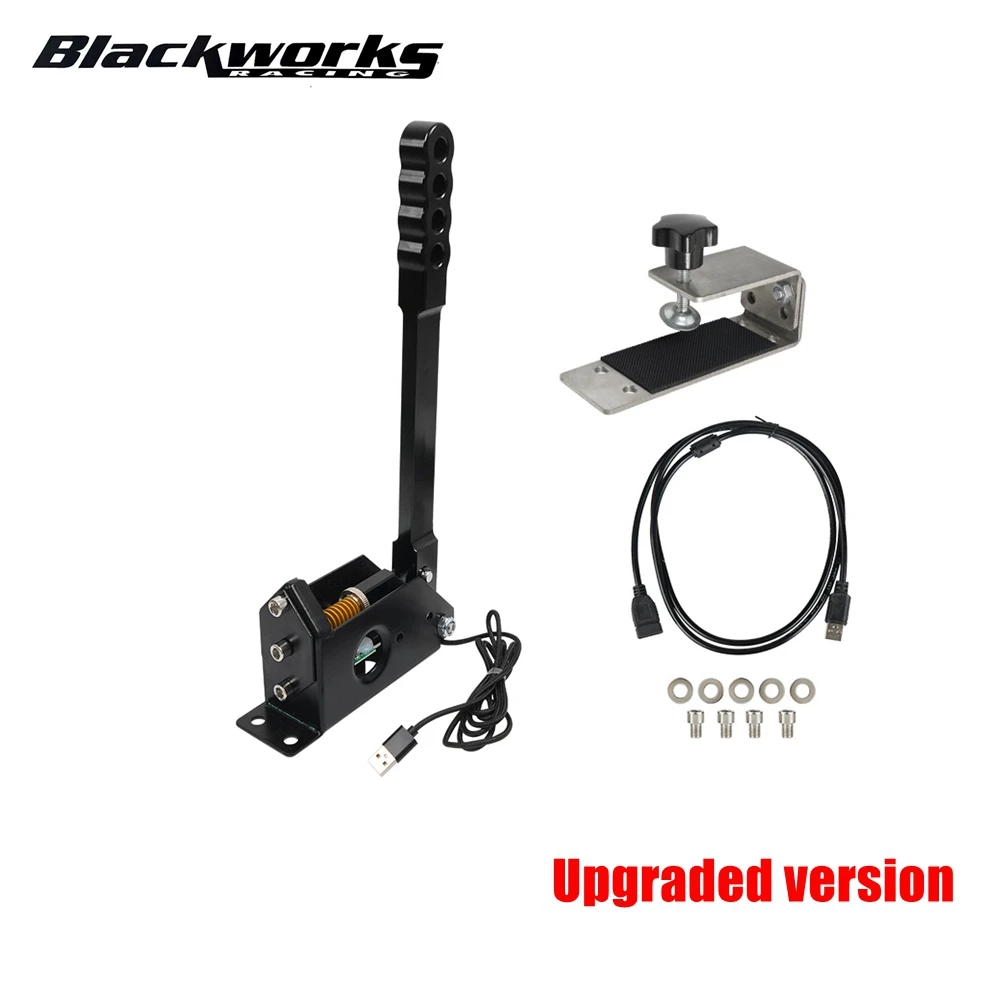
This package pairs an enclosed steel-body handbrake with a heavy-gauge bent steel desk bracket. Rather than drilling through a desk surface, the bracket uses a wide-pad hand-screw clamp with rubberized non-slip liners. When mounting to a standard office desk, prioritize clamps with a broad throat depth; shallow clamps will flex or rock under aggressive rear-brake yanks, degrading immersion and risking tabletop finish damage.
4. Standalone Steel Mounting Hardware
If you already possess a standalone USB handbrake with a bare baseplate and need to transition between a desk and a temporary stand, dedicated clamp assemblies are available separately.

A rigid clamp bracket constructed from 3 mm to 5 mm mild steel provides the necessary structural resistance against lever leverage. Verify bolt-pattern spacing before purchase: generic Chinese handbrakes generally conform to a standard rectangular 4-bolt pattern on the base, but minor manufacturing variations between production batches can require slight slot enlargement using a standard round file.
Structural Comparison: Desktop vs. Rig Considerations
| Form Factor | Primary Mount Type | Spring / Resistance Tuning | Best Suited For |
|---|---|---|---|
| Open-Spring Modular (Slot 1) | T-Nut / M6 bolts to aluminum profile | Exposed spring shaft; easy to shim or swap | 8020 profile sim rigs; adjustable cockpit heights |
| Enclosed Dual-Plate (Slot 2) | Base flange holes or adapter plate | Internal spring; moderate disassembly needed | Wheel stands and rally setups with pre-drilled plates |
| Desk-Clamp Bundles (Slots 3 & 4) | C-clamp friction mount on desktop edge | Fixed rate spring / elastomer bumper | Desk racers running clamp-on wheels (G29, T300) |
Calibration and Software Setup
Because budget USB handbrakes do not ship with dedicated vendor utility suites like Fanatec Control Center or Moza Pit House, configuration is handled directly via Windows and your racing simulator's binding menu.
- Windows HID Check: Plug the device into an onboard USB port (avoid unpowered multi-port hubs). Press Win + R, type
joy.cpl, and press Enter. The handbrake will appear as an generic joystick controller (often named "ARDUINO", "HANDBRAKE", or "HID Game Controller"). Double-click the listing to verify the axis moves smoothly from 0% resting to 100% full stroke. - In-Game Axis Assignment: In titles like Assetto Corsa, DiRT Rally 2.0, or EA Sports WRC, map the device under the Handbrake Axis option rather than a digital button binding. Verify the axis direction: if the car locks rear wheels at rest, check the "Invert" checkbox in your simulator controls menu.
- Deadzone Tuning: Generic Hall sensors can occasionally pick up tiny residual voltage changes near mechanical rest. Configure a 3% to 5% bottom deadzone inside the simulator to guarantee the rear brakes do not drag while driving on straightaways. Similarly, set an upper deadzone (around 90%–95%) so you achieve 100% axle lock without having to wrench the lever against its physical mechanical stop with excessive force.
Practical Maintenance and Rigidity Tips
To extract the best performance from a sub-$70 USB handbrake, apply these two mechanical fixes immediately upon unboxing:
1. Eliminate Lateral Lever Play: Generic handbrakes often arrive with minor side-to-side slop at the main pivot bolt. Snug down the pivot locknut until lateral wobble disappears, but ensure the lever returns instantly under spring power without binding. If metal-on-metal friction is present, adding thin nylon or bronze thrust washers lubricated with lithium grease will yield a substantially smoother throw.
2. Secure Cable Strain Relief: The USB cable exit on budget handbrake sensor housings often lacks robust rubber strain relief. A violent yank on the lever can snag the cable, shearing the thin solder points off the internal controller board. Fasten the USB cord to your mounting plate or rig frame with a zip tie, leaving a dedicated service loop to ensure no tension reaches the internal electronics.